
Pneuma
Thank you for purchasing our Pneuma theme for WordPress. This guide will help you get set up and running with the theme.
Follow our documentation to learn how to set up the demo for Pneuma.
Table of Contents
Customizer
The appearance of your site can be adjusted inside WordPress’ customizer. To help organize the options here, we’ve broken them down into several groups (panels). We’ve tried to make the name self explanatory. Here’s a quick run down of the option groups.
Branding
This panel has your logo and also favicons. Favicons are the small icons that appear by a site’s URL in the browser’s navigation bar.
You can upload an image logo or select a font to use if you’d rather have Pneuma use the site’s title instead of an image logo.
Header and Navigation
This panel has options for your site navigation. You can choose colors and fonts for your navigation menus. You can also enter text for the above header bar here. If you add text to the bar it will display. If no text is present, it will not be shown.
Styling
This panel has options for the main content areas of the theme. You can choose fonts, default layouts, image lightbox skins and more here.
Advanced
This section has additional options for your site. You can change the number of staff shown per page, add custom CSS and disable the subtle animations that are part of the theme.
The WordPress core and many plugins will also add new panels to the customizer that you’ll likely see there.
Home Page
To set up your home page, go to the Pages section in your dashboard and click Add New. This will create a new page for you. Enter a title for it at the top and then look in the right hand column for a box labeled attributes. In that box there is a drop-down menu for templates. Choose “Home” for the template and publish your page. If you plan to have a blog, go on and create a page for it as well. You don’t have to select a specific template for it.
Now go to the Customizer (Appearance > Customize) and click on the Front Page section. Here you can choose what your front page displays. Click on the option for a “Static Page” and then from the Front Page menu there, select the home page you just created. For the posts page, select the blog page you just published. Save your options and that will set the new front page for you.
Navigation Menus
You can set up your site’s navigation menus by going to the Appearance section in your WordPress dashboard and selecting Menus. Here’s a quick video to show how this works:
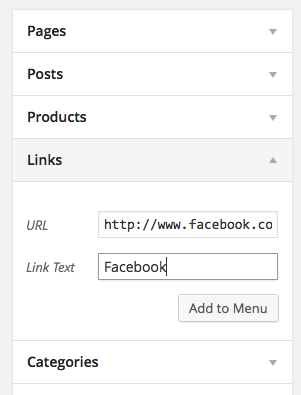
The social icons in the right hand side of the navigation bar in the demo are made with a navigation menu. If you’d like to do this on your own site you can. Create a new navigation menu just for your social icons. Look in the left hand column for the “links” section. You’ll use this to add in your social icons. Just enter the full URL to your profile on the social network you’d like to link to. Add a label for it, the name of the network would be a good idea. Then add the link to your navigation menu. Repeat that for all the networks you’d like to add and save your menu. Then assign your menu to the “Social Icons” menu location. That will cause your icons to be visible there.
Here are the social networks with built-in icons:
- YouTube
- Skype
- Vimeo
- Google Plus
- Flickr
- Dribbble
Podcasting
To add a podcast episode, go to the Podcast section of your dashboard and select Add New. The screen here is very much like the screen when you add a new post. You can add a text description of your podcast into the main content box. This will help your messages be visible to search. An excerpt of this will also be present in your feeds for iTunes and any other services to make use of.
Below the main content box you’ll find another box where you can fill in the details of the podcast episode. You can upload audio and video files, and set other options. When you’re finished publish your podcast episode by clicking the publish button in the right hand column.
Staff
Creating staff is similar to making a page, post or podcast. Go to staff in your dashboard and select Add New. What’s typically the title will be the name of your staff member. The main content box will serve as the bio of the staff member.
There is another box in the editor where you can add additional information about your staff member like their job title, and social network profile URLs. The image for the staff will be the featured image. Once you’ve added in the information about your staff member, publish them.
You can then create a page to use for your staff. There is a page template called Staff List that you can use to display all of your published staff.
If you need more than one list of staff, you’ll want to make use of staff groups. These are basically categories for your staff members. When editing a staff member, look on the right hand side and you’ll see the spot for staff groups. You can create a new staff group there or assign staff to existing groups.
Once you’ve created a staff group and assigned members to it, you can then add the staff group directly to your navigation menu. That will give you a “page” that only has staff from that group in it.
You can also use the staff widget to display staff members from one staff group. It’s intended to work with the page builder that’s described below.
Page Builder
Pneuma is designed to work with the SiteOrigin Page Builder plugin. When you install and activate Pneuma, you’ll see a prompt in your WordPress dashboard to install and activate the plugin if it isn’t already. After you do that you’ll have some additional options for your pages.
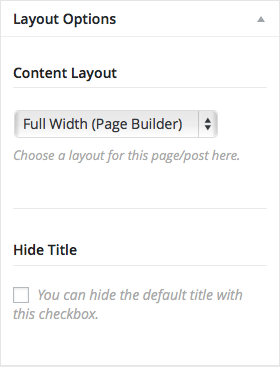 To use the page builder, create a new page or edit an existing one. Look in the right hand column of the editor and you’ll see a box for layout options. In this box choose the “Full Width (Page Builder)” option. Then look at the top of the main content box and you’ll see three tabs: visual, text, page builder. Click on the page builder one.
That will replace WordPress’ default content editor with a new one. This “page builder” is built around rows and widgets. You start by creating a row. That will pop up a dialogue where you can customize the row as it’s inserted. All of that can be changed later on if you choose to. There are several options for how many columns. You’ll also notice an accordion on the right.
This section has options for the design of this row. You can set colors, background images and more in this accordion area.
After you’ve added your first row, you can add widgets. This will open up another dialogue where you can select the widget you’d like to have appear. After selecting the widget, you’ll see the same options for the widgets content that you see in the typical widget section. There will also be options in an accordion like the row has where you can customize the design of the widget.
Pneuma includes widgets for podcasting, subscriptions, contact, and staff to help you create pages with the elements you’d like to have.
Troubleshooting
- If you notice some extra spacing between elements, navigate to your WordPress dashboard > Settings > Page Builder and click on the Layout tab. If “Row Gutter” and “Row/Widget Bottom Margin” have a value other than 0, remove that value, type 0, and save.
If you still notice spacing, then it could be that you manually added a number that is higher than 0 to the Gutter, Margin, or Padding settings when you edited a row.
Widgets have margin and padding settings as well, so make sure to verify those.
Lastly, if you still have unwanted spacing, if you added CSS code either in Appearance > Customize > Additional CSS or in a child theme, verify those to see if you added spacing there. - If columns aren’t displaying as intended, or some sections are not resizing properly, or it looks different from our demo, such as images displayed vertically rather than horizontally, navigate to your WordPress dashboard > Settings > Page Builder > Layout. Choose “Always” for this setting: Use Legacy Layout Engine.
If you have any questions, please open up a support post in our forum and we’ll be happy to help.