
Bottega
Thank you for purchasing our Bottega theme. This guide will walk you through the theme’s set up. If you run into trouble or have any questions, please feel free to ask for help in our Forum.
Setting Up Your Home Page
- Go to the “pages” section of your WordPress dashboard and create a page called “Home.”
- In the right hand column while creating the page, you’ll see a box labeled “Page Attributes.”
- In that box there is a drop-down for page templates. Choose “Home” and then publish your page.
- Next go to the Settings section of your dashboard and select “Reading.”
- At the top of this page you can choose to have the front page display your latest posts or to display a static page.
- Choose to use a static page and then select your “Home” page from the drop-down.
- Update your settings.
Theme Options
Most of the theme’s settings can be customized via the theme options page. You can access the theme options page by going to the appearance menu in your WordPress control panel and selecting “Theme Options.” The theme options page is broken up into three tabs to make it easy to navigate. Save your changes to make all updates live.
Identity
This tab allows you to choose a logo for your site. If you’d like to use an image logo, choose image from the “Text or Graphic Logo” drop-down at the top and upload your image there.
For the “Text” option, the site’s title will be displayed for the logo. The next options allow you to set it’s font and color. You can also upload favicons below that. The favicon is the small image that appears next to a website’s URL in the navigation bar of a browser. The Apple shortcut icon is what’s placed on the home screen when someone creates a shortcut to your site.
Home Page
The home page tab controls several aspects of your home page. The first part is the “featured row” which is the row of five boxes that’s below the slideshow on the home page. There are three possible sources for those images. You can choose to use WordPress posts. If you go with that option, you’ll be able to also choose the category of posts displayed.
The text shown will be the title of the post and a short excerpt of the post content. The image displayed will be the featured image of that post.
Another option is to display items for a menu group. With this option you can specify the group you’d like to display. The text shown will be the title of the menu item and the image will be the featured image.
The third option is to show custom images. If you choose that option, you’ll need to upload images in the upload fields provided below. You can also add in text and a link for each image.
At the very bottom below that are the controls for the slideshow. The actual slides are created in the Media section. Here’s a quick video showing how they work:
Header
The header section contains options that relate to the header section of your site. You can enter a phone number that appear above the navigation menu. It’s possible to have that be a link as well. Say your phone number is (213) 617-2398. Then to make that a clickable link on a smartphone, you would use this as the link: tel:+2136172398. Make sure to leave out all other punctuation.
You can also choose the styling of your navigation menu here as well as the background of the header.
Content
This tab has quite a few options. At the top you can choose to use the included image lightbox and pick the style. You can also select if your blog archive shows the full content or an excerpt by default. The rest of the options here will allow you to choose how the text in your main content area looks as well as the buttons in use on your site.
Sidebar
The sidebar options allow you to set how the widget areas of your site look. You can choose text and color options on this tab.
Footer
The footer tab contains the options for the site’s social media icons and also lets you choose the appearance of the footer. You can enter your phone number (or any text you’d like to). You can also replace the default copyright statement with custom text as well.
To include a link to any social network, just enter the full URL to your profile on the site. For example a link to Twitter would look like:
There’s also an uploader there if you’d like to add a network that isn’t included in the default set.
Background
On this tab you can set the options related to the site’s background. You can upload an image and choose how it repeats (or doesn’t). You can also select a color too.
Advanced
The advanced tab has some options you may or may not need to use. If you’d like to change the URL slug of your staff members you can do that. Make sure to keep them all lowercase and with no spaces. If you do change these, you will need to go to the permalinks section of your admin and save them again to prevent not found errors.
If you need to disable the built-in theme updates, you can do that with the next option. You can also turn off the Google fonts if you need to.
The very last option is a box for custom CSS. You can enter any custom styling that you’d like to apply to the site here. One popular style is to move the content down on your pages/posts so the logo doesn’t cover it up. To do that, enter this there:
#content,
#page-full {
	padding: 40px 10px 10px;
}
Food Menu
Creating your food menu is similar to creating posts for you blog. To begin go to the Menu section and select “Add New Menu Item.” That will bring up a screen that looks like this:
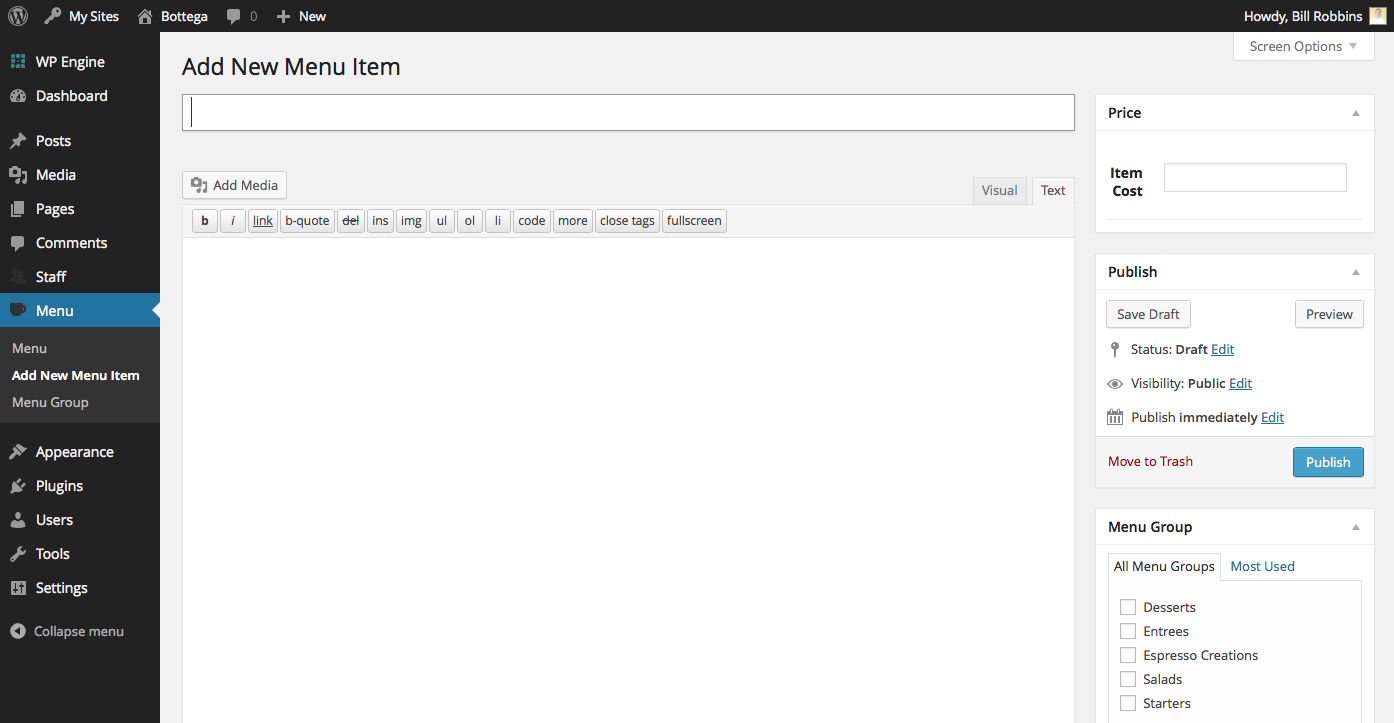
At the top here you’ll enter the name of your menu item. To the right of that you can enter the price. You can use any, or no currency symbol. In the main content area on your left, enter the description of your menu item.
After that look in the right hand column and you’ll see a box for “Menu Groups.” This is how Bottega organizes your menus. If you’ll think about how you want to arrange and organize your menu — appetizers, desserts, entrees — any sections you’re planning on having. Each one of those will be a Menu Group. In the box on your right, you can create a new menu group or select any existing ones. After that, you’ll want to publish your menu item.
Once you’ve added a few of these you can then add your menu to the front of your website. To do that, go to the Pages section and select Add New. As you create a page, look in the right hand column for a box labeled attributes. There’s a drop-down menu there for templates. Choose “Full Menu” there and publish your page. That will give you a menu for the front end of your site that lists all of your menu items broken down by menu group.
There are two other ways to add in your menu items. One is to add your menu groups directly to the navigation. To do that, go to the Appearance section and select Menus. In the left hand column you should see Menu Groups listed. If you don’t, then click the screen options tab in the top right hand corner and make sure the box next to Menu Groups is checked.
Then you can add your menu groups to your navigation just like you would a page or category. That will create a dynamic page that shows all the published menu items in that group only.
We’ve also incorporated what’s called a “shortcode” that lets you place a food group listing wherever you want. Just paste this code:
Just replace burgers with the “slug” of the menu group you’d like to display. You can find the slug by going to the Food section and selecting “Menu Groups.” The slug will be listed next to each group.
You can use this to create pages that have a mixture of menu groups and text/media. This is the most flexible option.
Navigation Menu
To configure the site’s main navigation, go to the appearance area of your control panel and select menu. Here you can add pages, categories and custom links to your site’s navigation menu. The theme comes with one area to accept menus, though there is a navigation widget where you can also place a menu if you so choose. To make an item a sub-menu, drag its title slightly to the right and it will become a sub-menu item of the page above it (see image). Changing your menu structure will not affect your permalink structure.
Here’s a quick video to show how the navigation works:
Blogging
Including your blog with Bottega is simple. Create a master category where all your blog posts will be listed. Then add that category to your navigation. That will create a “blog” on your site. Just make sure to add all posts you’d like to be included to that category.
Bottega also now supports WordPress post formats. These let you have page layouts specifically for certain types of pages/posts. Bottega supports image, video and gallery post formats in additional to a “default.” Here’s the differences:
Widgets
Bottega has three sidebar areas where you can add widgets. The first is the home page, below the featured row. The second appears on all pages with a sidebar. The last appears on all posts and archive pages. The menu section and the full-width page template do not have any sidebar areas.
The theme also includes custom widgets for a Facebook Like Box, Videos and a custom Contact widget. To add widgets, just drag and drop them on the widget area where you’d like them to be included.
Image Sizes
- Here are the suggested image sizes in the theme:
- Featured Row: 167 pixels wide by 167 pixels tall.
- Slideshow: 960 pixels wide by 350 pixels tall.
- Staff: 400 pixels wide by 600 pixels tall.
And that’s our Bottega theme. If you have any questions, please post them in our forum and we’ll find you the help you need. Thanks.