Page Builder Plugin
You can use the page builder to create completely custom layouts for individual pages and products. This article will show you how to re-create the “Anyway You Want” product in the finesse theme demo (https://demo.organizedthemes.com/finesse/product/anyway-you-want/).
1. Go to products in your WordPress dashboard and click on Add New.
2. Look in the right hand column and you’ll see a box near the bottom for layout options. There’s a drop-down menu there for the “content layout.” Choose the Full Width (Page Builder) option.
3. The large area at the top of the product page, where it has the picture of the girl blowing a bubble is the “hero” or the product. To add that, look down below the main content box for a box labeled “Hero Area.” At the top there you can select to include the hero area. As soon as you select to include the hero more options will open up for you. You can enter a title, caption and button for the first slide there. You’ll find an uploader for the background image. That where the girl with the bubble is added in the demo.
If you’d like to have more than one slide, you can create additional ones. The demo just has one.
4. Next, go to the main content box, the one below the product title. At the top of it there will be tabs for visual, text and page builder. Click on the page builder one.
The page builder arranges content into rows to keep things organized. Here’s a screenshot of the structure of this product:
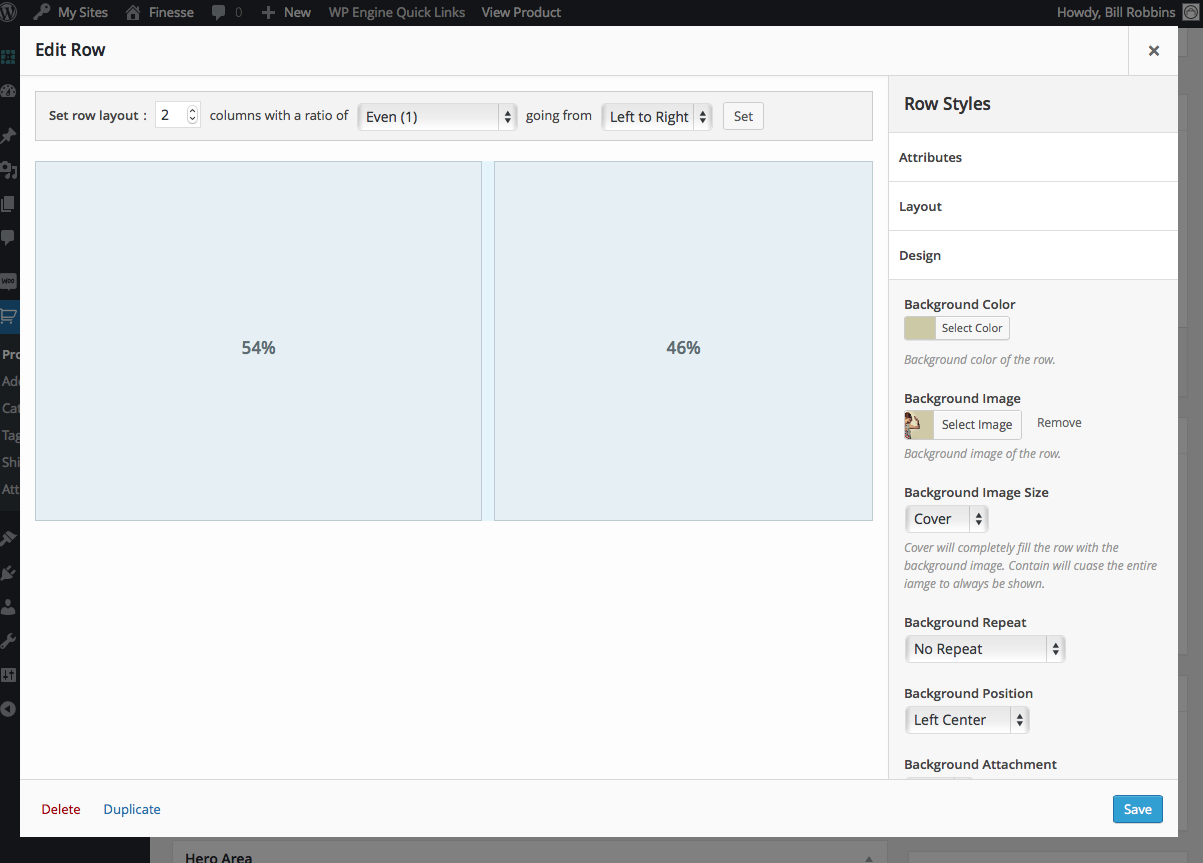
To begin adding the content, click the “Add Row” button. This will bring up a pop up that will let you configure the row a bit. In the demo, we have two columns in the first row which is the default layout.
The picture of the girl on the brown background is the background of this row. To add a background image, click on the design label that’s on the right hand side of the pop up. This will open up options related to how this row looks.
The image of the girl is the background image. To set a background, click on the “select image” button that’s just below where it says background image.
To have the image fill the entire row’s background, in the background size drop-down choose “cover” option.
After you’ve set your design options, click the save button. You can change these in the future if you’d like to. Click the wrench icon that’s at the top of each row to change these options.
5. The content for the row is added via widgets. Click on the add widget button that’s at the top of the page editor box. If you’ve installed the BlackStudio TinyMCE Widget plugin you can add a Visual Editor widget here. That would give you a widget that has the same editor that the default page/post does with add media buttons, styles and so on. You could also add in a text widget if you’d rather keep it simple or write your own HTML.
In the demo of this row, the widget is in the right hand column. The left hand column is empty so that the background image will show through.
6. After you’ve finished the first row, add another row. In the demo, the second row also has two columns. Unlike the first, this one splits up their spacing a bit differently. At the top of the pop up when you’re inserting a row there is a drop down menu where you can choose from some preset column layouts. This row uses the “even” layout.
The picture with the shoes is the background image of this row. There is a text widget added to the left hand column. In that text widget there is a “shortcode” that inserts the add to cart button. A shortcode is a small bit of text inside brackets that WordPress replaces with content on the front end of your site. You can place this shortcode where you’d like to have an add to cart button in your widgets:
It does not output the price so you’ll want to place that near the button so people know what the item will cost.
7. The next row features two columns again using the “even” layout. This time a background image is not set though. The left hand column has a widget that has the “Show Other Products” text in it.
The right hand column has a widget in it. This widget has a WooCommerce shortcode inside it that looks like this:
That tells WordPress that we’d like to pull four products from the dresses category and display them four to a row. WooCommerce has quite a few shortcodes that you can use. You can read about them at http://docs.woothemes.com/document/woocommerce-shortcodes/.
That’s how this particular row works.
8. Lastly is the “Summer Sale” row. It uses one column only with a widget for the text. The image of the shorts is a background image.
You can really do a lot with the page builder. It’s possible to add space inside rows or inside widgets if you need to adjust how things look by default.


