
United
This post explains how to set up your United theme. If you need help installing the theme, there is a quick screencast in our video section that explains how to install a WordPress theme.
Theme Options
After installing the theme, you’ll be directed to the Theme Options page. You can find the theme options by going to the Appearance section in your WordPress control panel and selecting “Theme Options.” Here you can set the options that are available in the theme.
General Tab
This tab lets you set the general options for the theme. Up first is your site’s logo. You can choose to have the site title displayed as your logo, or you can choose to use an image. If you select an image, click the upload button under “logo” and you’ll be able to add your own logo there. Once the upload finishes, click “use this image.”
You can also upload a favicon (the small icon that sits beside your site’s URL in most browsers) and an Apple shortcut icon (this is used on iOS devices’ home screens when a shortcut is placed there). Just upload the images you’d like to use and select them and your icons will be included.
The “display tagline” option allows you to show the site’s tagline below the logo. The tagline text is set by going to the Settings section of your control panel and selecting General.
The next option is to use either an excerpt of the full content on your archive pages. This determines how much of each post is displayed on your main blog page (not an individual blog entry). Choose excerpt to have a short teaser of your content or full content if you’d like it all displayed.
United includes a built in image light box. If you’d like to disable that feature, just select “no” there. You can also choose among seven different styles of the light box. The demo uses the “classic” style.
Single posts and podcast episodes can have social sharing buttons. You can choose to include or exclude those there. The default layout sets how your pages and posts will look by default. You can choose to have a left hand sidebar, a right hand sidebar, or a full-width page with no sidebar. This can be overwritten on individual pages/posts.
Lastly the Footer Text is the text that is displayed in the left hand side of your footer. You can place any text here you’d like to.
If you’re using the Mailchimp widget, you’ll need to enter your API key number as well as the list ID number. You can find those inside your Mailchimp account.
Lastly you can choose to disable automatic theme updates. This is useful if you plan on modifying the theme itself and don’t want to lose any of your modifications. The best practice for making modifications is to use a child-theme.
Header
This tab allows you to set up the header of your site. The top option, “Header Bar Menu,” allows you to choose from a typical WordPress navigation menu or the “mega” menu style that’s in the theme demo.
If you choose a “mega” menu, then the next several options allow you to name the sections of your menu. The words placed there will appear in the header. To include a section, place a label in that spot. To leave it out, don’t enter a label. The content for each section is added in the widget section (Appearance > Widgets). There are widget areas that correspond to the mega menu sections. You can add your widgets to each section to populate your mega menu.
Below that you can choose what is displayed on the right and side of the header bar. You can choose to display a search box, a link or even nothing if you’d like to.
If you choose a link, you can pick an icon to go along with it. You can then enter the text you’d like to make a link with the URL you’d like to link to.
Last up is the label for your mobile menu. When viewing the site from a device with a small screen, both the mega menu and the WordPress menu are replaced by a select menu that’s better suited for mobile devices. You can pick a label here to let your visitors know what clicking there will do.
Slideshow
This tab allows you to select options for your home page slideshow. You can choose to have the slideshow play automatically or not. You can have arrows appear when you hover over the slideshow or not. You can also set the duration of each slide and how long the transition takes (both in milliseconds — 2000 milliseconds = 2 seconds).
You can also choose to have the slides fade or slide as the transition too.
To add a slide go to the Media section and select “Slides.” Next to where it says “Slides” at the top of this screen, click “Add New.” Adding a slide is much like creating a post. You can give it a title which will help you keep track of what slide is what.
The image of the slide is the “featured image” that you choose there. If you’d rather use a video, paste the embed code for the video you’d like to use in the box for it.
Here’s a quick video made with the Progress theme that shows how the slides work.
Audio & Video Podcasting
These tabs allow you to fill in the details for your podcast feeds. These work with the audio and video podcast feed templates to create the feeds that you give to iTunes or make available directly to your listeners.
You can use the same information for each feed, just be sure in the names to specify which one is for audio and which is for video so your subscribers know which one they are getting.
Styling
United has numerous styling options for you to choose from. Most of the options on this page are also available in the theme customizer. We recommend using the customizer to choose your colors as it’s a much nicer interface for making changes. There is a link to the customizer at the top of the styling tab or you can find a link by going to Appearance and selecting Themes. There is a link to the customizer under the theme name.
Creating Your Home Page
 Here’s how to set up your home page. First go to the “Pages” section in your WordPress control panel. Create a new page. In the right hand column you’ll notice a box labeled “Page Attributes.” In that box choose “Home” from the template drop-down menu. Publish your page.
Next go to the Settings section of your control panel and choose “Reading.” At the top, you’ll notice a option to choose what your “Front page displays.” Choose “A static page” and then select the home page you just created from the drop down menu. You can also specify a page here to serve as your blog (all posts) if you’d like to. Update your settings.

That will set the home page to be like the one in the demo with the settings you made earlier. The content for the home page is from widgets. You can add these by going to the Appearance section and selecting Widgets. If you need help with them, there is a quick screencast in our video section that can walk you trough using them.
Podcasting
Adding podcast episodes is much like creating a post. Click on Podcast in your control panel and then select “Add New.” There are a few difference between adding a podcast and a post. Below the main content box there is a section where you can upload your podcast files and set some of the media details:
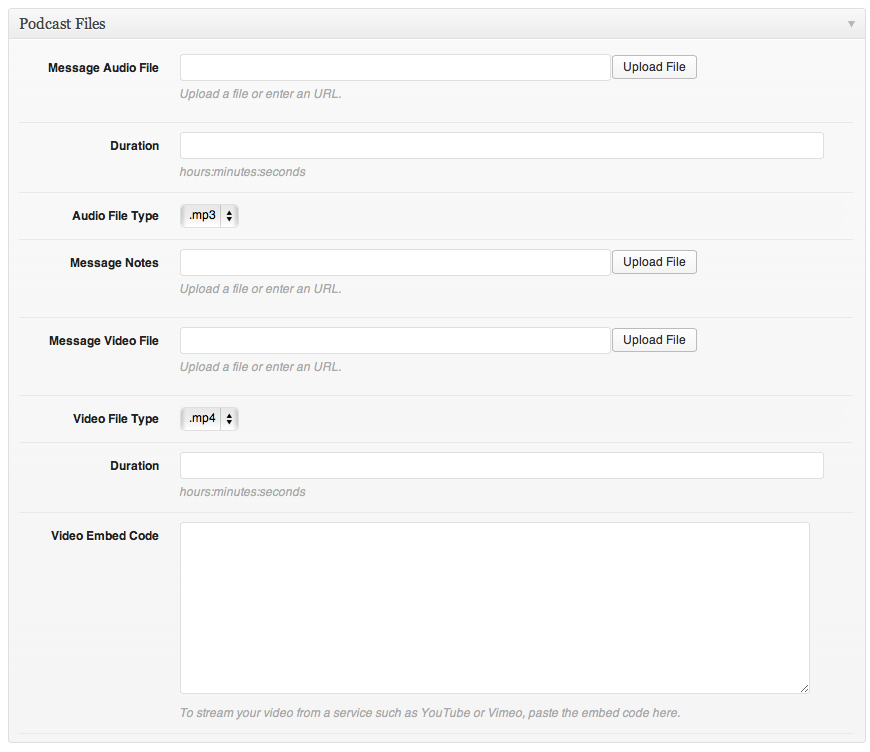
Podcast Details
You can use this box to upload your audio file, video file and notes. All are optional. For the audio and video files you’ll need to also enter a duration. Use the format hours:minutes:seconds to note how long the file is. A 43 minute and 23 second long file would look like 00:43:23. It’s important to include every section even if it’s zero.
If you’d like to display the video on your site you can. Paste the embed code for your video in the box provided and then choose the “video” format. That will cause the video to be displayed at the top of the episode.
If you’d like to display the message artwork at the top, choose the “image” format and the featured image will then be displayed at the top of the episode.
The last spots you’ll want to set are in the right hand column. You can add a speaker and a series for your podcast episodes. These can be handy ways to organize your messages. Both are optional.
Series
One feature we added with United was the ability to list all your series with artwork in one place. To do that, you’ll first want to go to the Podcast section and select Series. There you can create series and upload their artwork. You can also enter a description for the series if you’d like to.
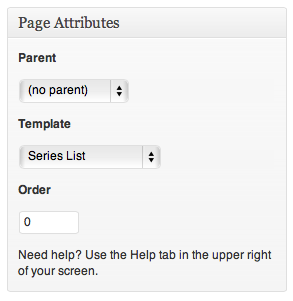
Series List Template
Once you’ve created a series and added a least one episode to it, you can set up your series page. Go to the Pages section and select “Add New.” After that, look in the right hand column and you’ll see a box labeled attributes. In the drop-down for template, choose “Series List.” Publish the page and you’ll now have a list of your series along with their artwork. As you add more series they will be displayed starting with the one that was created most recently.
Podcast Feeds
United supports both audio and video podcast feeds. These page templates are not intended to be viewed on the front-end of your site like the series template is. Instead they generate the necessary information for iTunes and RSS readers to find your audio/video files for your podcast.
To use one, create a new page. Choose the appropriate feed template from the drop-down on the right. The publish your page. The template will take information from your podcast episodes and also from either the audio or video podcasting section of the theme options page to produce your feed. Copy the URL to your feed and you can then submit it to iTunes. You can also use the social widget with theme to let people subscribe via RSS. Just paste the URL you copied into the spot for the RSS icon.
You can have both audio and video feeds, just one, or none. It’s all up to you.
Podcast List Archive
The last podcasting template is the Podcast Archive List. This one will display all of your podcast episodes in one spot. It’s especially useful if you don’t use series or you’d just like to have master list.
Staff
United has a built in staff section that you can use to display your staff members. To add one, go to the Staff section in your control panel and select “Add New.” Enter the information you’d like to include about your staff member. There are numerous options for social media links for your staff members. To include one, enter the URL to your profile page with that network and then choose the corresponding icon. That will cause it to be displayed on the front of the site.
There are two ways to add a list of staff members to your site. If you only need one list, then you can use the staff page template. It will display all your staff members in one place.
If you need to have more than one list, you can do that too. When you’re creating a staff member, if you’ll look in the right hand column, you’ll see a spot for “staff groups.” Basically these are like categories for your staff members. You can use them to group your staff members together.
Once you’ve added staff members to groups, you can then add the group to your navigation directly. That will create a “page” for that particular group. If you don’t see staff groups in the navigation builder (Appearance > Navigation), click on the screen options tab in the top right and make sure the box by “staff groups” is checked.
Formats
United has support for three formats built in: image, video and default. These can be used with both pages and posts. The image format if selected will display the featured image of the page/post at the top above all the other content. The video format will display the video you’ve placed the embed code for in the featured video box. It will also appear above the other content.
Each page and post can also have three different layouts. You can choose to have the sidebar on the left, on the right or have the content be full width. The default arrangement is set in the theme options, but you can override this on any page/post.
Image Sizes
Here are the image sizes that are used in the theme:
- Featured Images and Slider — 960 pixels wide by 460 pixels tall
- Staff Members — 405 pixels wide by 525 pixels tall
All other image sizes are derivatives of these.
Child Theme
If you’d like to modify the United theme, we recommend using a “child theme.” This will allow you to make changes while keeping them from being overwritten by updates to the theme as they are released.
Here is a sample child theme you can use to get started:
United Child ThemeSo that’s how the United theme works. If you have any questions or trouble, please post them in the forum and we’ll be glad to help.
Thank you for your business.