
Selfie
Thank you for purchasing our Selfie by OT theme for WordPress. We do appreciate it. This guide will help you set up your site using the theme.
Theme Options
Once the theme is activated, you’ll be taken to the Theme Options page. You can find this page at any time by clicking on Appearance on the left hand side of your control panel and selecting Theme Options.
The options in the theme are broken up into several tabs where related items are listed together. In Selfie you’ll find:
- Branding
- This is where you add your logo, your favicons and choose your logo colors and font if you’re not using an image logo.
- Background
- This tab allows you to set the overall background color of the site. It’s mainly visible on inside pages and posts. The home blocks have their own background images so you’ll set those elsewhere.
- Home Blocks
- Here you can choose the fonts used in your blocks.
- Content
- The Content tab has options to set colors and fonts for the main content areas of the theme. This is mainly for your inside pages.
- You can also choose if your blog posts display the full content or just an excerpt here.
- Footer
- Change your footer text and color here.
- Widgets
- This section sets the colors used in the slide in widget area on the right hand side of the site.
- Buttons
- Here you can set the background and text color for your buttons and social media icons.
- Advanced
- The last tab allows you to turn off theme updates and Google Fonts. It also has a box where you can add custom CSS styles.
That’s a brief rundown of the Theme Options page. There is an export tool in the Appearance section (Options Import/Export) that you can use to make a backup of your options or move them to a different site. Backing up your options is highly recommended.
Theme Customizer
Most of the styling options are also available in the Theme Customizer. You can find this by going to the Appearance section and selecting Customize. It provides a way to preview your colors and fonts before making them live on your site. It’s the best way to make those choices.
Home Page
Selfie includes a unique home page that you can use on your site to make your imagery and content really pop. Here’s how to set it up.
-
Create a Home Page
 Go to the Pages section in your WordPress control panel and select Add New. This will create a new page. Look in the right hand column for a box labeled Attributes. In that box is a drop-down menu for templates. Choose “Home” from that drop-down and publish your page.
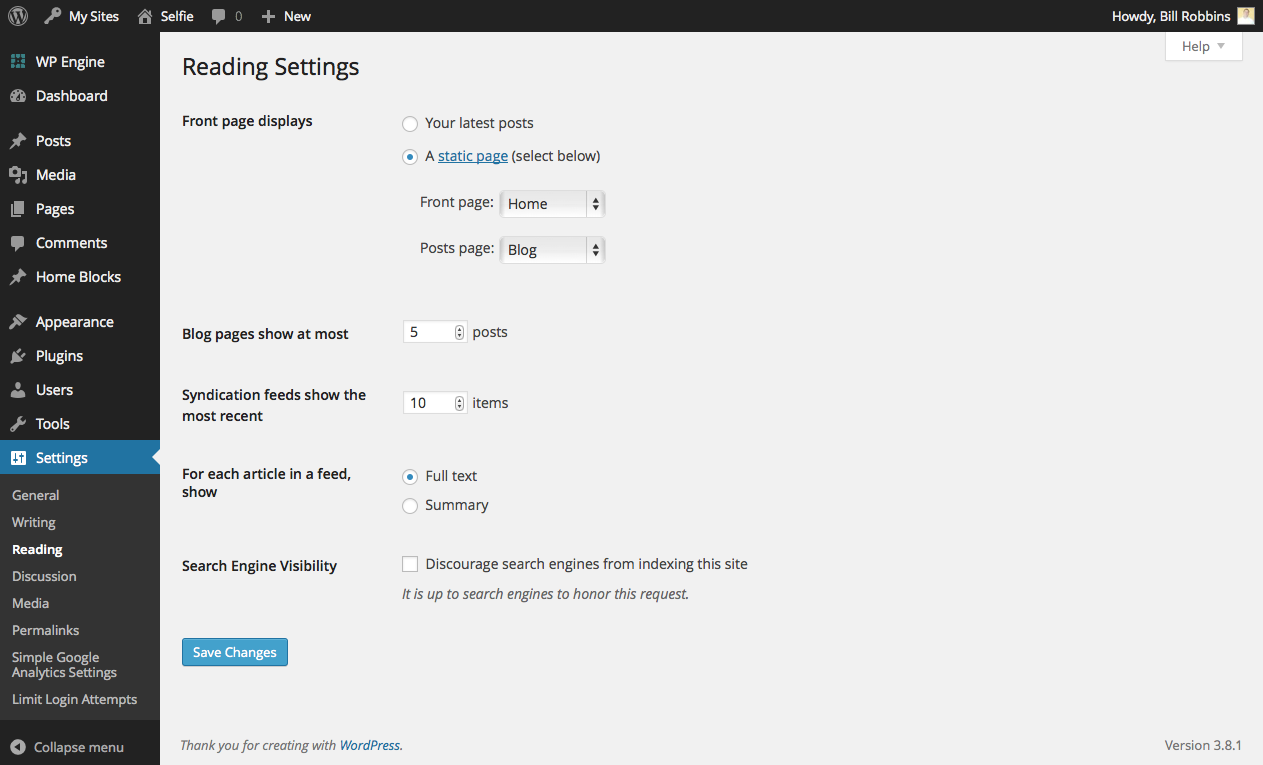
Next go to the Settings section in your Control panel and select Reading. At the top of this screen you can choose what your front page displays. Choose a static page and then select your new home page from the drop-down menu there. Once you update your settings you’ll now have the home page template set up.
-
Home Blocks

The home page is divided into “blocks.” You can add these by going to the Home Blocks menu item in your WordPress control panel. Here’s how these blocks work.
The title is for your reference. It’s not displayed on the front of the site, but will help you keep track of your home blocks.
The “Hero Image” is the large image that fills the background of the block. If one is not selected, the background color will be displayed instead. To add an image, click the Add Image button and either choose an image from your media library or upload a new one.
If you’d like to have a pop-up gallery of images, you can add those below the hero image in the “Gallery Images” section. Just click on the “Add New” button to upload or choose an image. To add another one, just repeat that process again.
You can also add in text on top of your image if you’d like to. The Home Block Content spot allows you to enter that like you would a page or post.
In the right hand column you’ll find a box for colors. You can use that to customize the colors that are used in that particular home block.
Once you’ve entered in the appropriate information, click the “publish” button and your home block will now be visible on the front page of your site. Up to 20 home blocks can be displayed on your front page.
So that’s how the home page of the site is set up and made to work.
Widgets & Navigation
In Selfie, the navigation and widget area is “off canvas” which means you have to click the button in the top right hand corner to slide it in. This is where the site navigation menu is located. It’s also where the theme’s widget area is.
To add your navigation menu, go to the Appearance section and select Menus. Here you can set up your menu and then assign it to the theme’s menu location. Here’s a quick video to show how WordPress navigation menus work:
To add in your widgets, go to the Appearance section and select Widgets. If you need help with widgets, here’s a quick video to show how they work:
Adding Animations
You can add in animations that will slide your content in from the left and right hand sides as the user scrolls down. This effect can be added to the home page where you’re using a “Home Block Page – Content” widget or on an inside WordPress page.
The animation code is added with a shortcode. Here’s how it works:
Just replace the This is where the content goes for the left hand side. with the text you’d like to have slide in from the left and the This is where the content goes for the right hand side. with the text you’d like to have slide in from the right. Once you publish your page, WordPress will take that shortcode and turn it into the animation for you.
Thank you again for choose Selfie. If you have any questions, please feel free to ask them in the Selfie Forum