
Grassroots
Thank you for purchasing the Grassroots theme. These instructions will guide you to getting your site up and running by walking you through the theme.
Table Of Contents
- Theme Options
- Create A Homepage
- Hero Section
- Campaign Extension and Name Your Name Own Price plugins
- Navigation Menus
- Staff And Sponsors
Theme Options
Once the theme is activated you’ll be taken to the theme options page. This page is broken up into several tabs to group the options together in logical groups.
- Header
- This tab allows you to upload a logo (can be overwritten per page), set navigation menu options (can be overwritten per page), upload favicons and choose fonts for the hero section.
- Background
- You can set up the site’s overall background on this tab.
- Home Sections
- Each section of the homepage can have a unique background and colors. You can set those up here.
- Content
- This tab allows you to make choices related to the main content box of the theme. You can choose colors, fonts, default layout here. It’s also possible to turn on/off the built-in lightbox as well as choose the “skin” of it on this tab.
- Footer
- It’s possible to set colors for your footer here as well as custom text for the left and right hand side of the footer.
- Widgets
- Here you can choose the colors of your sidebar widgets.
- Advanced
- The last tab allows you to change the URL slugs for the staff sections of the site. You can also disable Google Fonts and theme updates if you’d like to. Lastly there is a box where you can add any custom CSS you’d like to use.
Many of these options are also available in the customizer, especially the ones that relate to appearance.
Create A Homepage
 Here’s how to set up your homepage. First go to the “Pages” section in your WordPress control panel. Create a new page. In the right hand column you’ll notice a box labeled “Page Attributes.” In that box choose “Home” from the template drop-down menu. Publish your page.
Next go to the Settings section of your control panel and choose “Reading.” At the top, you’ll notice a option to choose what your “Front page displays.” Choose “A static page” and then select the homepage you just created from the drop down menu. You can also specify a page here to serve as your blog (all posts) if you’d like to. Update your settings.

The content on the homepage is made up of widgets. You can add those by going to the Appearance section and selecting Widgets. There are ten widget areas on the homepage where you can add in widgets.
Hero Section
Each page (and WooCommerce product) can have a “hero section” which is the large section you see at the top of the homepage. To add this, first create a page (or edit an existing one). Below the main content box you’ll see a new box called “Hero Area Options.” In this box you can add your text, media and choose colors that will apply only to the hero area on this page. Here’s a run-down of the options:
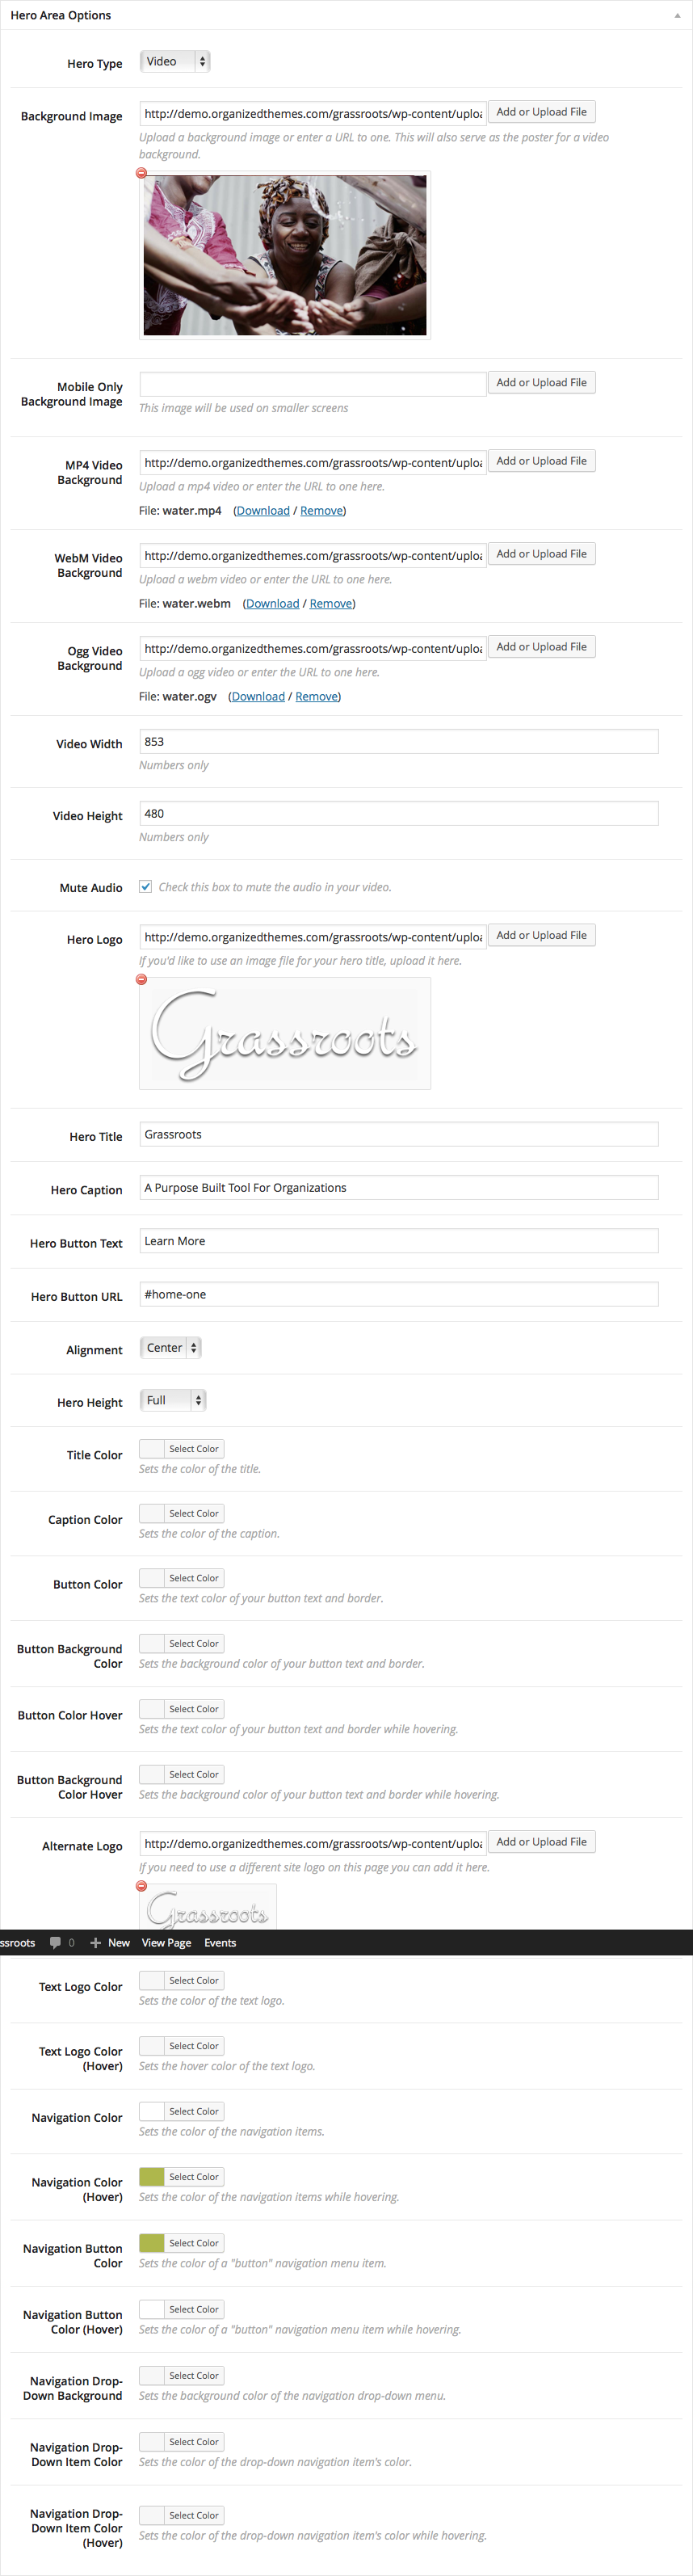
At the top of this box you can choose what type of hero area to have. To include it, choose either image or video. The first option is the background image. This will be the media that appears if you’re using the image option. If you’re using the video this will also be the “poster” image that’s displayed before the video has loaded. There is also a spot if you’d like to upload an image that will appear only on smaller screens. This is optional.
If you’re using video, the next fields will be for you. To get full coverage across browsers you will need to upload your video in a few different formats. You’ll need to include a MP4, a webM, and a OGG file. You can convert your videos for free into other formats at online-convert.com
Upload your videos to the appropriate fields to make sure the file types match up as they should. Next you’ll want to enter the height and width of your video to make sure that they scale properly as they cover the background of the hero section. You can choose to mute the audio or not.
The next section allows you to set what your hero section says. You can use an image to have “logo” of sorts instead of the title (like the Grassroots demo’s homepage). If you’d rather have generated text you can simply enter a title and caption below.
There are fields so you can have a button in the hero section. This can go to any URL you choose. You can also have the button go to another spot on your page if you’d like to. For your inside pages, enter this as the URL:
#content
and the button will direct your visitors down to the content part of your site. On your homepage, you can send them to any section of your homepage by using this:
#home-one
where the one is the number of the home section you’d like to direct your visitors to.
The hero section has a few different layout formats you can choose. You can align the text to the left, center or right. It’s also possible to choose between three different heights of the hero section.
The remainder of the options in this box relate to how to text that overlays the hero media. You can use these to change the colors of the hero title, text, and button plus the logo and navigation menu items. That can be helpful if your media conflicts with your site’s normal colors there.
Note that you can add an alternate logo by editing a Page (not Post). That would overwrite the default one. This is helpful for when your hero image or video prevent the logo from being visible.
Plugins
Campaigns and Name Your Own Price
The campaign section of the demo is site is created with the WooCommerce plugin. This excellent shopping cart handles all of the transactional elements, allowing you to collect donations and sell items if you’d like to. In order to use our campaign plugin, you’ll need to install and activate WooCommerce first.
We do have some suggested settings when using WooCommerce to get your best results. After the plugin has been installed and activated, go to the WooCommerce settings. On the general tab, scroll down to the bottom. Uncheck the box by “Enable Lightbox” (may not be available in your new WooCommerce version, so no need to worry about it) as Grassroots has a built-in lightbox that you can use. If you’d rather use the one that’s in WooCommerce, leave this box checked and turn off the theme’s lightbox in the Theme Options page (Content tab).
For colors, we recommend setting the primary color to:
#aeb54c
and the highlight color to:
#431768
as those will match the defaults in the theme. You’re free to change these, but those will allow elements to start out matching.
Once you have WooCommerce set up, you can begin creating campaigns and setting up the name your own price products. The instructions for downloading and using the campaign plugin and the Name Your Own Price plugin are found on this page: https://www.organizedthemes.com/campaign-extension-for-woocommerce-plugin/
Navigation Menus
You can set up your site’s navigation menus by going to the Appearance section in your WordPress dashboard and selecting Menus. Here’s a quick video to show how this works:
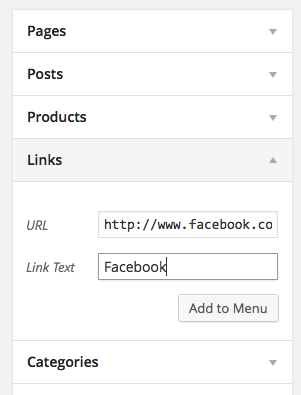
The social icons in the right hand side of the footer in the demo are made with a navigation menu. If you’d like to do this on your own site you can. Create a new navigation menu just for your social icons. Look in the left hand column for the “links” section. You’ll use this to add in your social icons. Just enter the full URL to your profile on the social network you’d like to link to. Add a label for it, the name of the network would be a good idea. Then add the link to your navigation menu. Repeat that for all the networks you’d like to add and save your menu. Then assign your menu to the “Social Icons” menu location. That will cause your icons to be visible there.
Here are the social networks with built-in icons:
- YouTube
- Skype
- Vimeo
- Google Plus
- Flickr
- Dribbble
The Grassroots demo also has a “button” in the navigation menu. Here’s how to turn a menu item into a “button.” In the menus section of your dashboard, click on the “Screen Options” tab on the top right hand corner of the screen. Check the box next to CSS Classes (optionally, you can also check Link Target and Title Attribute) and close your screen options.
Then, find the item you’d like to add that effect to. Click on the down arrow on the right hand side of the menu item to open up its options. In the field for CSS classes, enter this:
button
and update your menu. That should turn your menu item into a button.
Navigation menu colors:
Changing the color of the menu can be done in Appearance > Theme Options > Header or by editing each page. Note that by editing each page, that will overwrite what you have in Theme Options. Theme Options is for general use, the default for the whole website, but each Page (not Post) gives you the ability to change that for that page only. This is helpful for when your hero image or video prevent the menu from being visible.
Staff and Sponsors
In Grassroots you can create lists of staff and sponsors. These two areas work the same so to keep things simple, we’ll walk through staff. The same directions also apply to the sponsor section.
First you’ll need to add a staff member. To do that go to the Staff section in your dashboard. Click the Add New Staff Member link. You’ll place the name of the staff member at the top. The main content area will be where their “bio” will be placed. Below that is a box where you can place the details about this staff member. You can give them a job title as well as fill in their email address, phone number and the URL to their various profiles on social network sites. The supported networks are the same as the list in the navigation menu section above.
You’ll also want to add a featured image. This will be the picture of your staff member that is displayed on the front end of the site.
After you’re finished adding content, publish your staff member. Next go to the Pages section in your dashboard and create a new page. Look in the right hand column for the attributes box. Choose the “Staff List” template and publish your page. This new page will list all of your staff members in one place.
If you need to have more than one list of staff you can. To do that you’ll need to make use of “Staff Groups.” These work basically like categories do posts. When you’re editing a staff member, look in the right hand column and you’ll see a box labeled staff groups. Here you can create a new staff group or add your staff member to an existing group.
The idea here is to add the staff you’d like to have displayed together to the same staff group. Once that’s done, you can add your staff group to your navigation menu just like you would a page. Staff groups should be one of the content types listed on the left hand side of the navigation builder. If it’s not, click the screen options tab in the top right hand corner and make sure the box by staff groups is checked.
When a staff group is clicked by a visitor on the front end of your site, they’ll be taken to a “page” (really a dynamic archive) showing all the staff that have been assigned to that group. You can create as many groups as you need to in order to display your staff as you’d like to.
The same principal applies to sponsors as well. Sponsors do have one additional option for them. There is a sponsors widget you can use to display the sponsors from a sponsor group together. You can see an example of that near the bottom of the homepage in the demo.
Thank you again for using Grassroots.