
Elite
Thank you for purchasing our Elite theme. This post will help you get it set up and running on your site. For reference, we’ll be using the theme demo as a guide.
If you’d like to set up your theme as a copy of the demo, there are instructions and sample content available here.
Theme Options
Once you’ve installed and activated the theme, you will be taken to the theme options page. You can access these options at any time by going to the Appearance section of your WordPress control panel and selecting Theme Options. It’s important to save your options before you start setting up the rest of your site otherwise many of the features won’t work properly.
The theme options are organized into several tabs that correspond to various sections of your site. Most of the options are styling related–colors, fonts and so on. Some notable exceptions are your logo. You can upload an image logo in the “Header” tab. The Hero tab has font options for the large “hero” media section at the top and also sets the options for the slideshow. You can control the slide duration and other options there.
To change the layout of most pages in your site, go to the Content tab. At the top, you can choose a different default layout. That can be overridden on any page/post. You can also select the lightbox style to use there, or disable that feature if you’d rather.
The advanced tab has some important options in it. First up you can set the URL “slugs” for your staff members and staff groups. This will change how the URL’s of these items are displayed. Once you make a change there, you’ll need to go to the Settings section in your WordPress control panel and select Permalinks. Once there you’ll need to save your permalinks again (you don’t have to change them). Otherwise you’ll likely have “not found” errors on your site.
You can also disable the automatic theme updates here. That could be helpful if you’ve modified the theme files directly and don’t want to lose those changes through an update. You can also turn off the output of the Google Fonts there too if you’d like to. The last option there is for any custom CSS that you’d like to use.
There is a backup for your theme options too. You can find that by going to the Appearance section and selecting Options Import/Export. There you can download a file that contains a copy of the options you’ve selected. It’s always good to backup!
Home Page
To create your home page, first go to the Pages section and select Add New. This will create a new page for you. Look in the right hand column for a box labeled Attributes. In it, you’ll see a drop-down menu for Page Templates. Choose “Home” there and publish your page.
Next go to the Settings section in your WordPress control panel and select Reading. At the top of this screen, you can select what your front page displays. Choose “A Static Page” and then select your freshly created home page from the top, drop-down menu there. Then update your settings.
All of the content on the home page, except for the hero section, comes from widgets. The home page is split up into ten optional areas for your home page widget blocks. To add your widgets, go to the Appearance section and select Widgets. Each widget has it’s own options that can be accessed once it’s added to a widget area. Here’s a quick video to show how widgets work in general:
Hero Section
One of the best features of Elite is the “Hero” section which is your full-screen area at the top of your pages. Here you can use images, video and galleries to communicate with your visitors.
 This section is built around WordPress’ “formats.” When you’re editing a page (or post, or product) you’ll see box on your right that lists the available formats for you to choose from. Elite uses four formats to make up our hero section. Here’s how they work:
Standard
This is what a basic page/post looks like. It does not use the hero section, so if you’d like to leave that out, just select “standard” and your content will start right under the header.
Image
The next format up is “image.” This is how the home page in the demo is created. It will use the featured image of the page/post at the top of the screen. Here’s a quick video about featured images to help you use them:
That how the actual image is added. For any titles and captions you’d like to have at the top, you’ll need to use our “Hero Area Options” box. This box has fields where you can enter a title, caption, text for your button and also a link for your button. All of these are optional and will only appear if text is entered into them.
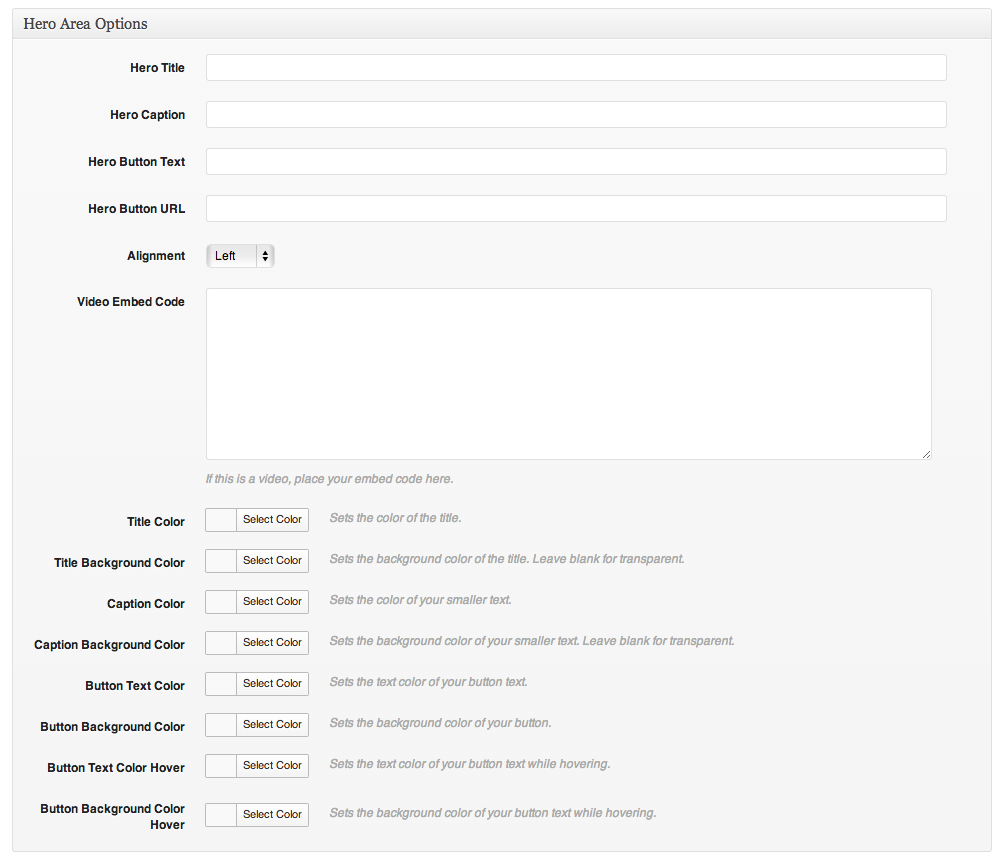
Hero Area Options Box
Below that are the options for how the text is aligned as well as the various color options for the text. Again, these are all optional. If you’d like to change the font or the font-size of the hero title and caption, that can be done in the theme options section.
For products using the image format, they have a separate upload spot for the image instead of the featured image. With WooCommerce the featured image is used for the catalog picture, so this allows you to have separate images.
Gallery Format
The gallery format works similar to the image, but you begin by going to the “Slides” section in your WordPress control panel. Here you can create the slides for your Hero Galleries. Start by selecting the “Add Slide” link and you’ll find a screen that looks like your post screen, just missing the main content box. The hero area options box we looked at in the Image Format is here too. All of the options work the same way here as they do there.
 The text, links, colors and so on will only affect this one slide. To organize your slides, you’ll want to look in the right hand column for a box labeled “slide group.” You use this box to group the slides you’d like to show together. You can create new groups, by entering their name in the empty box below the list. You can add the slide to an existing group by checking the box next to it. It’s also possible to add a slide to more than one group if you’d like to use it on multiple pages.
Once you’ve created at least one slide and added it to a slide group, it’s time to go to the page/post/product where you’d like to have the slides displayed. On the right hand side, you’ll choose the “Gallery Format.” Then look down below the “Hero Area Options” box and you’ll see another small box labeled “Slide Group” with a drop-down menu that you can use to select the slide group to display.

Choose your group from that box and then update/publish your page. That should pull in the slides that you created earlier for you.
It’s also possible to have video slides. Instead of setting a featured image for your slide, paste the embed code for your video (you can get that from the video service you’re using) and a video will be used instead of an image.
Video Format
The last format we’re using is for videos. You can use it to display a large video at the top of your page/post. To do that, choose Video as your format. Then look in the Hero Area Options box again. In the middle is a large field for your video embed code. In it, you’ll want to place the embed code from the video service you’re using. If you’re looking for a service, we highly recommend Vimeo because of their top notch player.
Once you’ve added your code there, update or publish your page and you should see your video at the top. To keep your video from distorting, we’ve set the video hero area so that the height is flexible. So depending on how large your browser window is and its aspect ratio, the video may not fill the full screen.
Mobile optimized hero images
For mobile hero images, we have a field where you can add a mobile optimized image.
For non-gallery hero areas (static image), navigate to your WordPress dashboard, edit the page that has a hero image, and scroll down to the “Mobile Only Background Image”. Add an image there and save.
For gallery based hero areas, navigate to your WordPress dashboard, click on Slides > Slides, and edit a slide. Scroll all the way to the bottom and you’ll see “Mobile Only Background Image”. Add an image there and save.
For both of the above types of hero sections, that is where you can add an image that is mobile optimized. You could take the existing images you have and crop them to show the part you want visible to your visitors. It has to be a portrait image – rectangular shape.
Footer
There are a few areas to edit the footer. That’s because the footer has a widget area (right above the most bottom area) and an area with simple HTML text (most bottom area).
1. Using the Customizer:
To edit the most bottom area, navigate to Appearance > Customize > Footer.
To edit the widgets that appear before the most bottom area, navigate to Appearance > Customize > Widgets > Footer.
2. Using the Theme Options, which has more options but doesn’t give you a live view on the right:
To edit the most bottom area, navigate to Appearance > Theme Options > Footer.
3. Using WordPress’s non-Customizer page:
To edit the widgets that appear before the most bottom area, navigate to Appearance > Widgets. Edit the Footer widget area.
Adding Animations
You can add in animations that will slide your content in from the left and right hand sides as the user scrolls down. This effect can be added to the home page where you’re using a “Home Block Page – Content” widget or on an inside WordPress page.
The animation code is added with a shortcode. Here’s how it works:
[animate]

[animate-left]This is where the content goes for the left hand side.[/animate-left]

[animate-right]This is where the content goes for the right hand side.[/animate-right]

[/animate]
Just replace the This is where the content goes for the left hand side. with the text you’d like to have slide in from the left and the This is where the content goes for the right hand side. with the text you’d like to have slide in from the right. Once you publish your page, WordPress will take that shortcode and turn it into the animation for you.
Navigation Menus
You can set up your site navigation by going to the Appearance section and selecting Menus. Here is a quick video to walk you through creating a navigation menu and assigning it to your site.
Products
Elite is built to work with the WooCommerce plugin for WordPress. If you’re using the theme to sell products, this is the plugin you want to use. Once it’s installed and activated, you’ll have a new section in your Dashboard for WooCommerce and Products. There you can add your products, set up your store preferences and payment options. There are a lot of settings, but since you’re engaging in online commerce, they are there to make sure your store runs properly.
Staff
Elite has an optional staff section. You can use it to display a list, or multiple lists of your staff members. To make a staff member, go to the Staff section and select “Add New Staff Member.” The screen here is basically like the post screen except, there is a large box below the main content box for the details about your staff members. Here you can enter their job titles as well as links to their profiles on various social networks.
On the right hand side of that screen you’ll see a box for “Staff Groups.” You can use this section to organize your staff members if you’re going to have more than one listing of them. You can create a new staff group by entering its name in the empty box there or choose an existing one by checking the box next to its name.
Once you’ve added at least one staff member, you can then add them to the front of your site. The simplest way to do that is with a page template. To do that, go to the pages section and select Add New. On the right hand side, you’ll see a box labeled “Attributes” with a drop-down menu for templates there. From that drop-down choose “Staff” and then publish your page. The listing of all of your staff members will be there. You can also add in a hero image/gallery/video as well as text above your list if you’d like to.
The second way to add in a list of your staff is by adding your staff groups directly to the navigation menu. To do that, go to the Appearance section and select Menus. You should see “Staff Groups” listed on the left along with the other content types. If you don’t, then click the “Screen Options” tab in the top right hand corner and make sure the box next to Staff Groups is checked. Then you can add your staff groups to your navigation just like a page or category. That will create a list of all the staff members in that staff group.
The last way to make a list is with a shortcode. You can use it to display a list of your staff on a page or post. To do that, edit the page where you’d like to have the list. Find the spot where you want it to go and then enter this:
[staff group="core"]
Just replace core with the “slug” of the staff group you’d like to display. You can find the slug by going to the Staff section and select Staff Groups. In the top right you’ll see a list of your groups along with their slugs.
You can place any text or images you’d like above or below the shortcode to give you maximum flexibility with how your staff section works.
Important notes:
1. If you’re using a widget to add the shortcode, you should use a Custom HTML or a Text widget. The Text widget allows you to enter it in both Visual or Text view. Those are able to generate the code from the shortcode.
2. Make sure that your Staff images are not too large in dimensions and file size. If you notice that you cannot view a certain staff member when logged out (not logged in) of WordPress, then it might be that the image is too large. Simply reduce its dimensions and file size to below 1200 width and 500kb and it should appear.
3. If you notice that the staff image on the staff page itself is showing up as a large image and pushing the text below it, then add this code to your Appearance > Customize > Additional CSS or in a child theme:
img.attachment-staff-full {
width: 450px;
}
You can modify the 450 to a larger or smaller number, depending on the size you’d like.
Testimonies
Elite also includes a testimony section where you can collect and display the testimonies of your customers. To use this section, go to Testimonies and select Add New Testimony.
On this screen, the title will be the name of the person who gave the quote. The content box is your spot to enter their quote. Once you’ve done that, you’ll want to publish them.
To use this area, just add the testimony widget to one of your sidebars. That will cause a random quote from one of your customers to be displayed. The results are cached every ten minutes to keep from overloading your database with queries.
Other Shortcodes
You can add in buttons via a shortcode if you’d like to. Just enter this:
[button url="http://yourlink.com" label="Button Text"]
and replace the http://yourlink.com with the URL you’d like to link to and the Button Text with what you’d like the button to say.
If you need to add in a video that’s from a service that WordPress doesn’t have automatic embedding support for, you can use this shortcode:
[fit]Your video code[/fit]
Just add your video embed code in place of the “Your video code” text.
There is also a style for “lead” text which can be used at the top of a page or post. It will make the text a bit larger and set it apart a bit. Here the code for it:
[lead]Your lead text[/lead]
Just replace the “Your lead text” with what you’d like to say using that style.
The last shortcode will let you insert a staff list into a page of post. Just enter this:
[staff group="core"]
and replace the core there with the “slug” of your staff group. You can find the slug by going to the staff section in your control panel and selecting staff groups. The groups will be listed there along with their slugs.
That’s how the Elite theme is set to work. If you have any questions, please post them in the Elite Theme Forum and we will be happy to assist.
Thanks again.